Perfect Sugar Free & Low Carb Ice Cream Cones. 0.5g net carbs only!!!!!
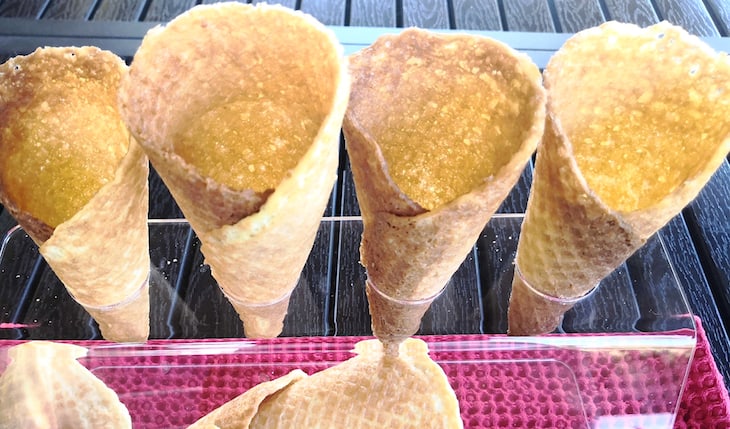
They are lovely and crispy as soon as they’re rolled and do not soften over time. Make a batch in advance and keep them for when you need them, ready to be filled with your favourite ice cream.

Technically, I could have stated zero carbs, because each cone contains less than 1g net carbs. Indeed many keto and low-carb recipe bloggers would have done exactly that. But I’m too precise and too honest. With my recipes, you know exactly what macros are delivered, so you can judge what to have and how much.
I have to admit that these Perfect Sugar Free & Low Carb Ice Cream Cones took me ages to get right. It seemed mission impossible. A bit of an epic frustration story reminiscent of my krispy kreme doughnuts…
Still. I’m so glad that I persevered, because these cones are absolute perfection.
I won’t lie, they are a bit tricky, but with patience and practice, you’ll get there too.

Equipment for Perfect Sugar Free & Low Carb Ice Cream Cones.
First and foremost, you must have an ice cream cone maker. You don’t need a fancy, expensive one. In actual fact, I tested multiple machines, before settling for the cheap one I have now. All of them basically failed to cook evenly, including an outrageously priced one that I will refrain from naming – in case I get sued.
The cone maker I use now isn’t brilliant. Far from it. It doesn’t have temperature control. There’s no timer. It tends to cook the wanna-be-cones unevenly. Instructions are rubbish and badly written. But, believe it or not, it still beats the most expensive one I tried (and returned – thank goodness for Amazon’s great return policy).
My Perfect Sugar Free & Low Carb Ice Cream Cones didn’t become ‘perfect’ until I sussed out that I must cook them for 3-4 minutes or until no more steam escapes. No idea what temperature is involved. Highly imprecise, but not my fault 🙁
To conclude, I don’t feel, hand on heart, that I can recommend any specific cone maker. Instead, I suggest you choose one that has the best reviews and keep your fingers crossed. Then follow instructions and practice until you get it right.

You will also need a wooden cone shaper. It’s a necessity. Try as you might, you will not be able to make nice cones without it. If the cone machine you have comes with a plastic shaper, ditch it. It’s useless. You’ll probably need to practice rolling the waffles tight enough to create a good conical shape. You certainly can do without a slippery, plastic one to cause you unnecessary frustration.
I speak from experience… THIS CONE SHAPER is the one I wholeheartedly recommend.

An ice cream cone stand is useful, but not necessary. Click HERE for the one you see in the photos.
The only other bits of equipment I use are a mixing bowl and a hand-held electric whisk.
How to Make Perfect Sugar Free & Low Carb Ice Cream Cones.
You’ll need an egg, erythritol, vanilla extract, hemp seed oil, hemp milk, almond flour and xanthan gum. The only ingredients you can substitute are hemp milk and hemp oil. You can use almond milk and avocado of flaxseed oil instead. It took me weeks months ages to get this recipe spot on. If you decide to swap or omit any of the other ingredients, the cones will not turn out as they should.
Erythritol is particularly crucial. You must not use the powdered form and it must be pure, 100% erythritol, not a mixture of various sweeteners. Why? It helps to create the crispy texture and speeds up the hardening process. Use a different sweetener and you’ll have soft cones, or hard cones that soften within hours. You don’t need a lot anyway, so if you’re worried about the infamous cooling effect, don’t be.
With all ingredients to hand, you’ll have 6 cones ready in 30 minutes, from start to finish.
See the batter consistency in the video clip? That’s what works in my cone maker.
As I’ve said before, you may well need to do a practice run (or two) with your specific machine. You might find that your machine works better with a thinner batter, in which case just add a little extra milk.
You will also probably need to practice rolling the waffles. My advice is to use parchment paper to cut out discs and then practice making tight cones using the cone shaper.
And don’t worry if you screw it up ;). Just leave the waffles/dodgy cones to dry, crumb them, add melted butter and you’ll have a great cheesecake base! No need to waste anything!
Others seem to have issues with the cone ‘seam’ not sealing properly. I don’t. My fail-proof method is to work over a tea-towel. Pay particular attention to the pointed end, roll the cone tightly and rest it with the outer seam facing down on the tea-towel.
Press down lightly and walk away (go and start the next wanna-be-cone in the machine). Then a minute or so later, you’ll find a perfect seal, on a perfectly crispy ‘sugar’ cone.
By the way, you’ll know that you’ve rolled the waffles tightly enough, if you need to twist the cone shaper to get it out (….be gentle!!!)

I think I’ve given you all the tips I can think of, so now you just have to get that cone maker out and have fun with these Perfect Sugar Free & Low Carb Ice Cream Cones.
Enjoy!
- Yield: 6
- Serving: 1 cone
- Calories: 85
- Fat: 8g
- Net Carbs: 0.5g
- Protein: 2.5g
- 1 large egg (55g)
- 1 tsp vanilla extract
- 30g erythritol
- 20g hemp seed oil
- 40g almond flour
- ¼ tsp xanthan gum
- 30g unsweetened hemp seed milk
- heat up your ice cream cone maker.
- whisk egg and vanilla extract until foamy, then add erythritol and whisk again until creamy and airy (I find an electric hand-held whisk works best - see notes).
- incorporate hemp oil and whisk for another 10 seconds, then add remainder of dry ingredients and, you guessed, whisk again until gluey and very dense.
- now add milk, stir with a fork and finally, whisk so it's all nicely incorporated.
- plop about 1.5 TBSP of batter on the centre of the bottom plate (DON'T SPREAD IT) and VERY SLOWLY lower the lid.
- cook 2-3 minutes (every machine is different - see notes).
- using a heat-proof, non-metal flexible spatula, lift the waffles off and onto a clean, flat tea-towel.
- working quickly, place your cone tool with the tip against the border and roll, maintaining pressure on the tip.
- leave the cone with the outer seal facing down, while you start making the next cone.
- your first cone will have already hardened at this point, so remove cone tool by twisting and jiggling gently, then place the cone in the stand to air dry.
- repeat until you've used up all the batter, for 6 cones in total (8 small).
If the mixture becomes too thick, add a little extra milk to loosen it.
These cones can just stay uncovered at room temperature, for several days, without losing their crisp texture.
If you want to make cups, rather than cones, just drape the wannabe-cones over a small upside-down bowl, shape them, and let them air dry.
Metric kitchen scales are an inexpensive yet invaluable gadget to ensure accurate measurement of ingredients. Store them upright in a cupboard or over your worktop and they'll only take up a tiny bit of space. Click HERE for the ones I use.


Oh WOW! I LOVE YOU! lol ok so I have been looking for a keto cone recipe for a good while now – tried many recipes no luck sooo disappointing. Finally gave up. I live in Florida USA (can be very humid and thought maybe that was why my cones would not crisp up. Came across your recipe and because of how you described your experience I decided to give it one more try, I just had my first krispy keto ice cream cone and I thank you for that:) so much fun when it turns out THANK YOU !!!!
Hey Kelly! You’ve just made my day a special one with your love. Thank you!
Happy to know your search is over! If your first one was a success, the rest will be child’s play. x
Lightyear is a unit of distance, not time.
Correct 😀
Can you freeze these. I am trying to make a Keto friendly “drumstick”. I’m going to give it a shot and see if the crunchy stays intact
I doubt it. It would probably become soggy once defrosted, like most pastry does unless it contains hydrogenated fats.
Curious to know what a keto-friendly ‘drumstick’ is. Can you elaborate?
Hi! Love the recipe out of all the ones I’ve seen, but can you please have a U.S. converter option? Grams are hard to get precise for me, I need tbsp, or cup variants. Apologies, if you have that somewhere I couldn’t see.
Hi i want to start off with I’m so glad I found your website!!! I live Australia and hemp seeds (only) have become legal here therefore I am unable to get hemp oil or milk for your ice cream cones. What would be a substitute for both? Please thank you cheers Sibel Rachele
Hi, you can use almond milk instead of hemp milk, and flaxseed oil or avocado oil instead of hemp oil. Same quantities.