
Queenketo Low Carb Pasta #3 Easy Shapes. 4g carbs per serving.
With or without a pasta machine, anyone can create a variety of pasta shapes to enjoy as part of their keto regime.
Welcome to my newest pasta recipe. It’s been a long time coming, since publishing the first two: Fettuccine Noodles and Lasagna Pasta Sheets, and something many of you have been requesting.
This one is actually a dough that’s stretched, shaped and dried. Which means that you can make it whenever you want and keep it in your cupboard stores for a long time, ready to grab for your favourite pasta dish.
Lupin Pasta
The idea behind this recipe was to replicate Kaizen Lupin Pasta. If you google it, you’ll see how expensive it is.
I have simply swapped one of the ingredients (Fava Bean Protein) with ground almonds. The natural almond sweetness counteracts the lupin earthiness, and works very well, in my opinion.

I did consider buying faba bean protein to see how the pasta would turn out, but wasn’t keen on paying for something that I would be unlikely to use ever again. I suppose I will have to try it at some point, because it does contain fewer carbs and fewer calories than almonds.
Plus it would suit readers who have a nut allergy or just wish to reduce nut consumption. For now, it will stay on my ever growing to-do list.
Does my Lupin Pasta taste the same as wheat-based pasta?
No. It doesn’t. I’d be lying to you if I said it does. But it cooks well, and once you perfect the boiling time to suit your palate, it’s a close contender. Remember that pasta is always drenched in sauce, so any ‘earthiness’ you might taste if you try it on its own, will be completely masked when the dish is put together.

How to Make Queenketo Low Carb Pasta #3 Easy Shapes
The method is identical to standard egg pasta. Combine dry ingredients, mix in whole eggs, knead, flatten, and shape. Simple if you’ve done it before. Not so simple if it’s your first attempt. Practice makes perfect.
The dough needs rolling out super-thin, otherwise the pasta shapes will be too thick and won’t cook properly. You can indeed do this by hand – like Italians have done for centuries – but without gluten, the dough won’t stretch as well.
The much better and easier option is to roll out the dough using a pasta machine. These are Made in Italy options:
I bought mine in Italy almost 40 years ago and it’s still going!
If you intend to make spaghetti or fettuccine, do make sure that whatever machine you choose has the attachment for these as well, rather than just flat rollers.


Italian Pasta Shapes
Once you have your pasta sheets ready, the world is your oyster. There are so many shapes you can create. This article is a guide to the most common shapes you’d find in Italy: https://www.bbcgoodfood.com/howto/guide/guide-pasta-shapes-italy
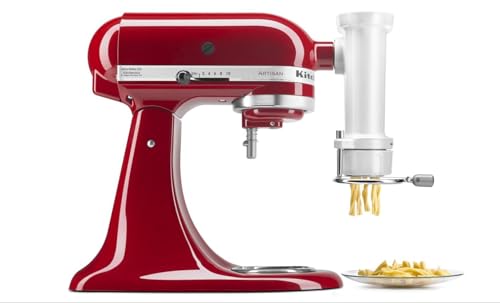
A few shapes are easy to do by hand, others definitely aren’t – you’d need a pasta extruder for them, such as the accessory that can be added to a KitchenAid, for example.
KitchenAid Artisan Stand Mixer
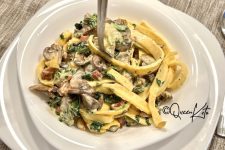
The easy hand-made shapes I tend to create are the ones you see in the images. Spaghetti and Fettuccine/Tagliatelle necessitate a Pasta Machine.
For the serrated edges of Farfalle or Pappardelle, I use my La Gondola Pasta Cutters. They’re hand-made in Italy and absolutely the very best!
If you have a KitchenAid Stand Mixer and Pasta Attachment, you can create more shapes, without the need to make pasta sheets first. And of course, the process saves a lot of time. I have not tested this recipe with my KitchenAid Pasta Attachment, and will add an update when I do.

If you’re new to pasta making, it is best to test a small quantity first, by following the recipe as is. You can decide to double or triple the recipe once you’re happy with the results, to make more pasta in one go.
My recipe delivers 5 servings of 50g each. It may sound too small, but it’s not. Unlike ‘normal’ pasta, lupin pasta is very filling. And once drenched in whatever sauce you prefer, it’s enough for a satisfying meal.
I highly recommend that you read through the entire recipe instructions and decide which method you wish to proceed with, before starting out.
Enjoy!

Queenketo Low Carb Pasta #3 Easy Shapes


Ingredients
- 150 g lupin flour
- 20 g tapioca
- 25 g ground almonds
- ½ tsp fine himalayan pink salt
- ½ tsp xanthan gum
- 3 large eggs - 170g net weight
Instructions
- weigh and mix dry ingredients in a large bowl.
- make a well and crack your eggs into it.
- using a fork, stir the eggs first, then widen the swirling motion to combine dry ingredients bit by bit.
- keep mixing, then, when the mixture is too difficult for the fork, put on disposable gloves (the dough will be very sticky at first) and knead until smooth - this may take several minutes.
- shape the dough into a cylinder and wrap it tightly in cling film - leave it to rest for 30 minutes.
- cut the cylinder in half, then each piece in half again, until you have 8 more or less equal pieces of dough; wrap each piece in cling film.
- sprinkle a little lupin flour over a silicone pastry mat.
- take one piece of dough and flatten it a little, dust with lupin flour on both sides and either roll it out as thinly as possible to a rectangle about 5-6" width, or use a pasta machine.
Using a Pasta Machine to Obtain Thin Pasta Sheets
- use 1 piece of flattened and dusted dough at a time.
- start at the highest setting (widest gap between rollers).
- pass dough through, fold into an approximate square, and repeat until you have straight(ish) edges - you can turn the dough, as well as fold it, if it helps create straight edges.
- lower the setting by 1 notch and pass the dough through; fold, turn, and repeat until you have straight edges again.
- continue to make passes at 1 notch intervals (no folding) until you get to setting 3.
- after the setting 3 pass, lightly dust both sides of the dough with lupin flour and pass it through on the final setting (2) - your pasta sheet should be smooth and almost transparent.
- N.B. if the dough shreds at this point, it means it's too sticky: re-shape it, go back to 1-2 settings higher, dust a little more lupin flour on both sides of the dough and continue.
- lay the pasta sheet over your dusted silicone mat.
Creating Easy Pasta Shapes by Hand
- for tagliatelle, use the machine attachment, or cut thin strips along the long length of the dough sheet, using a knife or a flat-edge cutting wheel.
- for pappardelle, cut wider strips as above.
- to make strozzapreti/trofie, use a flat-edge cutting wheel to slice the pasta sheet in half lengthways, then cut across every 1.5”; twist each rectangle using both hands and turning in opposite directions.
- to make farfalle, cut the pasta sheet in half lengthways, then cut across every 1.5”, using a serrated pasta cutter - if you don't care about obtaining serrated edges, a flat-edge wheel is fine; fold and pinch the middle of each rectangle to make a bow and lay it on parchment paper.
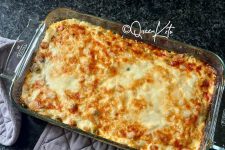
- for lasagna sheets, cut the pasta sheet into small squares (I recommend no larger than 4"x 4" or they will break when cooked).
Creating Shapes with the KitchenAid Attachment (not tested)
- connect the pasta attachment to your KitchenAid stand mixer.
- dust and feed walnut-sized balls of dough into the hopper; lightly push the dough through, although it should self-feed through the auger.
- speed setting 2-4 is best; the higher the setting the faster you'll need to be using the cutter, catching them in your hand, and laying them down on parchment paper.
- N.B. if your pasta "droops" it mens the dough is too soft and cannot hold its shape: add a little lupin flour to the dough; if the dough is too dry, it will not go through the press: add a little water to soften it.
Drying, Storing and Cooking
- leave your shapes to air-dry for 48-72 hours, until completely moisture-free (snap test).
- store in a sealed bag or container.
- boil your lupin pasta in generously salted boiling water for 3-8 minutes, depending on the shapes and thickness - taste test is best.
Notes
For keto pasta dishes, you should use a substantial sauce, i.e. the opposite of normal Italian-style pasta dishes, which consist of mostly pasta and a little sauce to coat it. This Lupin Pasta contains no gluten and only minimal starch, so don't expect it to be stretchy and have the mouth-feel of standard pasta. Providing your lupin pasta is 100% dry, store it in cellophane bag or air-tight container and it will keep for months in the cupboard. You can cook the pasta immediately, in which case, 2-3 minutes in boiling and well-salted water will suffice. For quantity per serving, weigh all the fresh pasta you've created and divide by 5.
Nutrition
This post contains affiliate links. As an Amazon Associate I earn from qualifying purchases. Whilst there is no extra cost for you, affiliation helps me buffer the expenses associated with running this site.


Hello,
Is it possible to replace 20 gr tapioca with something else ??
Tks.
If by ‘something else’ you mean to avoid starch, then no, Michèle. Starch acts together with the xanthan gum to bind the structure, so it’s essential. You could, however, use another type of starch.